Hello, esteemed readers! After much anticipation, we are thrilled to present an article detailing the methodologies we employ in rigorously testing our Cloud Native Core Banking SaaS platform. This article aims to provide practical insights that can be directly applied to real-world situations. Our goal is to offer valuable guidance to individuals seeking to improve their testing practices.
Initially, we intend to provide a comprehensive architectural overview of the platform using an illustrative diagram:
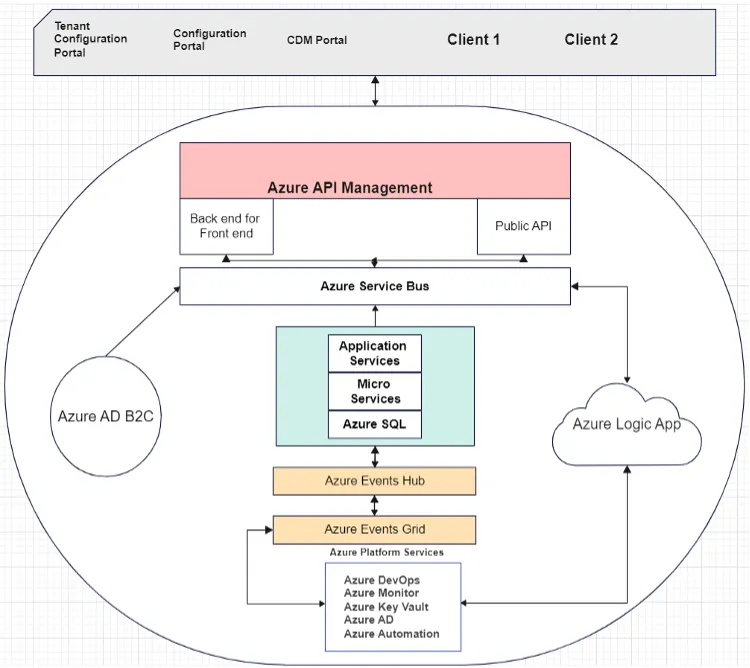
Given the platform’s complex architecture, we have focused our testing efforts on key elements.
Our Quality Assurance team has diligently tested various aspects, including UI (User Interface) interactions, component integration, acceptance testing, and thorough evaluations of components within the API framework and service communication.
Furthermore, the team diligently undertook System/Platform integration testing, meticulous scrutiny of Logic Apps, rigorous assessments of Data Migration processes, meticulous evaluation of Reporting mechanisms, and thorough Performance and Load testing protocols.
Before we jump into specific areas, let us say a few things about the “manual” aspects of the test process, like embraced testing standards, test management tools, regression testing, and release process. The ISAE 3402 standard was embraced to structure testing processes, while the ISO 25010 quality attributes were leveraged to enhance the robustness and comprehensiveness of the tests, covering various software attributes.
The Azure DevOps Test Plans tool is utilized to create, manage, and track test plans and suites. Each team possesses distinct test plans, encompassing various test case types grouped within test suites. A QA guild was established to foster cross-team coordination and alignment on testing strategy and integration. This guild comprises QA representatives from all teams and convenes weekly one-hour meetings encompassing all quality-related project aspects, ensuring universal awareness and harmony on quality-related matters.
Regarding weekly regression testing, orchestrated by the QA guild, a Regression plan is devised. This plan is partitioned into suites aligned with individual teams. Each team contributes their essential test cases for the current release to their respective suite within the Regression plan. Furthermore, comprehensive end-to-end journeys and Data Migration tests are curated by the QA guild and housed within dedicated suites.
As teams transition to automated regression tests, the QA Guild determined that teams can opt for the automation tools that best suit their needs. Considerations such as the nature of the team’s work guided these choices — for instance, a “UI Configuration” team might not benefit from an API tool, while a “Lending Internal API” team might not require a UI tool like Playwright. However, managing multiple weekly regression runs comprising approximately 100+ test cases posed a challenge. The analysis of run reports was becoming more burdensome than the automation and execution.
This led to the realization that the diverse reports generated by different automation tools in varying formats needed a streamlined solution.
Returning to the Azure Test Plans Regression plan, where all test cases are organized per team, offered a consolidated approach. The outcomes of these tests are presented on the Azure dashboard, accessible to all stakeholders. Based on these results, decisions about release approval, initiation of continuous deployment, or postponement of the release can be made.
User interface
Following the implementation of React and Typescript as our chosen front-end frameworks, we decided for Cypress to pair with Typescript as our front-end stack testing framework. This strategic decision was motivated by Typescript’s compelling advantages, including code development uniformity and enhanced analysis through Sonar Cloud. This enabled facilitated teams to adopt a more agile approach in their roles, as everyone is acquainted with the coding language.
Our testing strategy encompasses a range of essential aspects. We decided to use Cypress to conduct Acceptance Tests, oversee API communications, orchestrate Azure Web Jobs, and manipulate Azure Redis resources. Azure Web Jobs’ prominence and activation emerged when an initial E2E (Customer Journey) user flow became a contender for automation. EOD (End of Day) jobs are quite common in banking platforms, and Az Triggered Web jobs allowed us to simulate an EOD scenario at any time. To address this, we devised a solution involving a custom Cypress command. This specialized command facilitates the triggering of web jobs through API calls, aligning seamlessly with our overarching testing framework.
The requirement for web job testing emerged due to the automation of customer journeys, where End-of-Day jobs play a crucial role. By automating the triggering of web jobs, we have gained the ability to automate customer journeys at any given moment:

The essential action of clearing the Azure Redis cache arose due to the intricate interplay between our two interconnected portals. On numerous occasions, the persistence of cached data led to misleading outcomes, causing false negatives in our processes. Automation is done via the “Io Redis” library as described in the example and widely used across automation tests:

API testing
The platform had several levels of APIs in testing:
- Public APIs (REST — 2nd entrance into the platform beside the UI, open to the consumer)
- Underlying Service APIs (GraphQL — extracting data from DB)
- BFF (Backend for Frontend) APIs (REST — parsing data between UI and other resources)
Since some of these APIs differ in terms of method of communication, ways of authentication, etc., we decided to build a modular “mini framework” in C# (same language as platform backend) relying only on NuGet packages from verified and trusted sources (e.g., Microsoft) for the highest security assurance.
The framework then handles the differences between the APIs in terms of executing requests, deserializing responses into custom models (or JSON), and has custom assertion functions all of which allow for fast test development, test execution, and test reusability.
One of the many features we are proud of in this section of testing is the ability of these API tests to wait for a specific condition to be fulfilled and only then proceed with the execution of the rest of the logic and assertions. We implemented the mentioned functionality through the following custom method:

- The condition parameter allows us to execute any function repeatedly until its result matches our condition.
- The “frequencyOfCondition” parameter indicates how often the upper-mentioned function is executed (e.g., every 2 seconds).
- The parameter “timeoutTimer” specifies the duration for which the function will be iterated repeatedly. An exception is thrown if the duration is exceeded without meeting the defined condition.
- The “exceptionReason” parameter enables the configuration of a customized error message in cases where the specified condition remains unmet. This facilitates enhanced debugging, accelerates error tracing, and improves error reporting for clearer insights.
Example usage: In the scenario where you aim to test entity updates, a prerequisite involves creating a new entity. Rather than incorporating fixed timeouts, which can differ based on the specific entity and objective, consider the following example as an alternative approach:
- Create the entity.
- Repeatedly execute a Get Created Entity request until its response status equals 200 OK (or another way is until it no longer equals 404 Not Found).
Should the “GetCreatedEntity” response return a 200-status code within the designated time, your test will proceed to execute the Update Entity request. However, if the predetermined time elapses without attaining the 200 OK response status, the test will fail and return a customized error message telling us exactly which step in the entity update process is having issues.
Underlying service testing
Given the Azure cloud-based nature of the platform, interactions with the Underlying Services were established via the Azure Service Bus. To focus solely on testing the Underlying Services, we chose to send messages directly to the Service Bus. This alternative approach was preferred over initiating these processes via the user interface or APIs.
Another advantage is that it makes the Underlying Service tests faster and much more versatile/customizable since they do not have to depend on triggering the complete flow — E2E tests exist for this purpose.
We fully integrated our tests with Azure, again with security in mind therefore, the necessary parameters for communicating with Service Bus (Service Bus connection strings and various other secrets) are never stored within the tests but fetched directly from Azure using its own Azure endpoints and the Azure Identity NuGet package. Here is an example of how we fetched the Service Bus connection string:

Considering that the outcomes of these Underlying Services typically involve Data Processing and Data Storage, the anticipated results were verified within the Storage Accounts or Databases. Storage Account data was tested using the “BlobServiceClient” the Azure Storage Blobs NuGet package provided.
For Databases, instead of writing SQL scripts that are difficult to maintain and prone to typos, we used the Microsoft “EntityFrameworkCore” NuGet package, allowing us to query data using LINQ, eliminating the aforementioned difficulties.
Logic App testing
Logic Apps are widely used as orchestrators on Azure projects with many flow automation and orchestration applications. As such, they needed to be thoroughly checked and tested.
We developed an additional modular “mini framework” utilizing the Azure Management Logic NuGet package and the “LogicManagementClient” to address this requirement.
Like Underlying Service testing, to isolate the LAs we will be triggering them by sending messages directly to the Service Bus rather than through the UI or APIs. As the Logic App is triggered, using the Logic Management Client we can find our specific LA run by the unique parameters our platform has set up usually located in the headers of the HTTP request.
Here is an example of a function we created that does just that:

The “LaRetriever” parameter is an Azure-authenticated Logic Management Client
Now that we have singled out our specific LA run, again using the LogicManagementClient, we can list all its actions, check their statuses, and/or Base64 decode their content and perform further assertions.
Public API and Long Running Operations performance
From the backend and API side, we identified Public APIs and LRO (Long Running Operations) as most impactful to customer satisfaction regarding the platform performance capabilities.
We wanted to ensure the customer receives an appropriate response in a short and satisfactory time from our Public Apis, hence they will very quickly know if their requests have been accepted or if adjustments are needed.
Likewise, ensuring that Long Running Operation (LRO) processes within our system conclude within an acceptable period enhances the customer’s ability to seamlessly proceed with tasks, minimizing downtime and the need for context switching.
The performance of the Public API was monitored through Azure Workbooks. Utilizing the Kusto query language, we automated, processed, and refined request data obtained from Azure Application Insights. This data was presented to users as a comprehensible table displaying performance categories.
Here is an instance of measured requests for a specific endpoint within a user-defined period:

On the other hand, LROs (Long Running Operations) cannot be tracked well through Azure Workbooks so we had to create our solution for this purpose. The solution represented an automated flow consisting of tests that would:
1. Trigger the LROs.
2. Write the unique identifiers of each LRO into a JSON file.
3. Use those unique identifiers to match, extract and calculate the LRO performance from the database using “LINQ” and “EntityFrameworkCore”.
4. Write the performance metrics into the JSON file and sort them into performance buckets.
5. Convert the JSON file into a CSV table file (table of performance buckets similar as for the Public API example) for presentability.
6. Upload the CSV file to a user-specified Confluence page using Confluence API.
The entire process was coordinated using an Azure Pipeline, requiring the user to input solely the desired frequency of triggering the specified Long Running Operations (LROs) and the name of the confluence page where the generated CSV table file would be uploaded.
Data migration
Data migration proved to be one of the essential processes for our project, especially because our primary clients are banks. These banks already have significant amounts of data and need a smooth integration of historical and current client data into our cloud-based system. This critical procedure not only harnesses the advantages of cloud technology, such as scalability and cost-efficiency but also establishes a central access point for unified data retrieval.
Migration pathways
1. Full reset migration: For smaller datasets. One-time direct data transfer.
2. Batch migration: Tailored for larger datasets. Incremental data transfer.
3. Migration pipeline: Focused on testing.
Data preparation
Client data transformation is validated to ensure alignment with our standard model.
Data seeding with Azure
Azure Data Factory extracts reference data, subjecting it to rigorous testing to ensure alignment with our system’s established standards.
Migration sub-pipelines
These encompass pipelines designed for loading reference data, validating data, and facilitating data movement. Each of these pipelines undergoes thorough testing to ensure their reliability and performance.
DM testing — Ensuring data integrity
Testing is at the heart of our migration strategy. With three datasets designed to replicate and challenge real-world scenarios, we ensure robustness:
1. Environment preparation: Creating a neutral testbed to ensure no data residue.
2. Data transformation and insertion tests: These tests ensure data adapts correctly to the desired format and structure.
3. Migration validation tests: Validates that the data, once migrated, retains its structure and integrity.
4. Final reporting and functional tests: This phase ensures the migrated data’s functionality within the system.
NOTE: A noteworthy point to mention about error handling is that we deliberately employ a dataset containing invalid data. This deliberate choice allows us to evaluate the resilience and effectiveness of our system’s error management capabilities.
Reporting
Since reporting was another service of considerable importance for our clients, Data Warehouse (DWH) was introduced as the most effective solution.
The primary objective of implementing the Data Warehouse is to provide clients with the means to access their data and empower them to generate distinct reports for regulatory compliance and other business analysis requirements.
Expectations from this process were:
- Access to data for reporting and regulatory purposes
- Simple accessible, using tools as Power BI, Tableau or even Excel
- Autonomous (by the client) creation and generation of their customized reports
- Recent/up-to-date data
- Minimum (1/day or) 1/hr. updates of Data in DWH
- Security
- Secure connections (AD user Credentials + MFA + Whitelisting)
- Encrypted data in rest + transfer
- Role-based access (not all info for all users)
- Accessibility 24/7 or pay per use (depends on costs)
- Low complexity, Simple Data model, no “technical fields”
- Easy to combine and integrate data sources of several components (microservices)
- The reporting, or better info needed for a client, is quite broad
There are several types of data needs:
- Data for regulatory reports
- Management information
- Operational data
- Monitoring info
The testing scope encompasses the Azure Data Factory pipeline responsible for the Extract, Load, and Transform (ETL) process, which orchestrates data transformation from diverse sources and databases into the designated Data Warehouse (DWH). The overarching objective is to ensure the comprehensive presence of requisite data within the Data Warehouse, strategically positioned to facilitate reporting requirements.
Testing approach
The following paragraphs will outline the testing approach:
Golden dataset
An Azure-based database housing a ‘golden dataset’ has been established with the specific intention of supporting the automated testing procedures of the Data Warehouse (DWH) solution. This database is overseen and managed by the DWH Team by utilizing SQL scripts, and/or by directly populating data via portals or APIs.
The team is accountable for a particular module consistently furnished representative datasets that were appropriately interconnected.
ADF (Azure Data Factory) pipeline testing
The ‘golden dataset’ was the starting point for the Azure Data Factory test pipeline, used to verify the Azure Data Factory pipeline, which does transformation data to DWH, before releasing it to Production.
The first step of testing the pipeline for CDM was to copy the ‘golden dataset’ to a JSON file in blob storage. The JSON file must be in line with the format of the JSON file created by the dump service.
ETL (Extract, Transform, Load) testing
The goal is successful data reconciliation after the ETL process is done. The subsequent forms of data testing are scheduled for execution:
- Incremental ETL (Check if data added afterward appears after the ETL process)
- Metadata (Check if metadata is extracted and reloaded correctly)
- Data completeness (Check if all extracted data is loaded again correctly)
- Data quality (Check if all extracted data has expected values)
BFD (Backend for Data Warehouse) testing
The objective of BFD testing was to validate the successful creation of a service dump file within Azure blob storage and to ensure its completeness with all essential data required for subsequent transformation to the Data Warehouse (DWH).
DWH (Data Warehouse) Reports testing
Upon the successful execution of the ADF pipeline, instances of typical reports were generated in Power BI, subsequently undergoing end-to-end testing.
Automated tests outcomes marking
Documenting the results of test runs in a uniform/easy-to-read format for each regression posed a complex challenge. It became a laborious endeavor for teams to manually annotate outcomes for every test case every week, especially given that each team managed over a hundred test cases, which continued to expand. Automated run reports arrived in various formats, including XML, JUnit, and VS Test, some of which were not readily human-readable. Consequently, QA teams had to match these reports with the corresponding Azure test cases and record the run outcomes.
Upon completing a regression pipeline, we integrated a PowerShell script that was tasked with locating the run in Azure DevOps Test Plans — Runs, interpreting its content, mapping each test from the pipeline run to the corresponding test case in the Regression Plan, and finally marking the test case with its respective outcome.
To initiate this process, we initially required a method for retrieving the Build ID of the test run. The Test Build ID is a vital component of the Azure DevOps REST API, providing access to the test run report. Within the pipeline itself, we accomplished this by fetching the pipeline run ID and designating it as an environment variable. This variable was subsequently utilized within the PowerShell script and incorporated into the endpoint. The endpoint structure appears as follows:

It was easy to construct our endpoint since we know that “$Organization” and “$Project” will always be the same — they are the same across all our Azure DevOps. As mentioned above, “$buildIds” is provided by the pipeline itself. Then for the “$minLastUpdatedDate” and “$maxLastUpdatedDate” we just get today’s date and then subtract one day for the former and add one day for the latter because in our case, we know the run we are looking for from this build is always going to be today. So, this way we got our first important info, the Test Run ID.
Subsequently, a GET request is made to another endpoint using the previously acquired Test Run ID associated with the pipeline run:
Now, the response to this request is a large array of objects, each looking something like this:
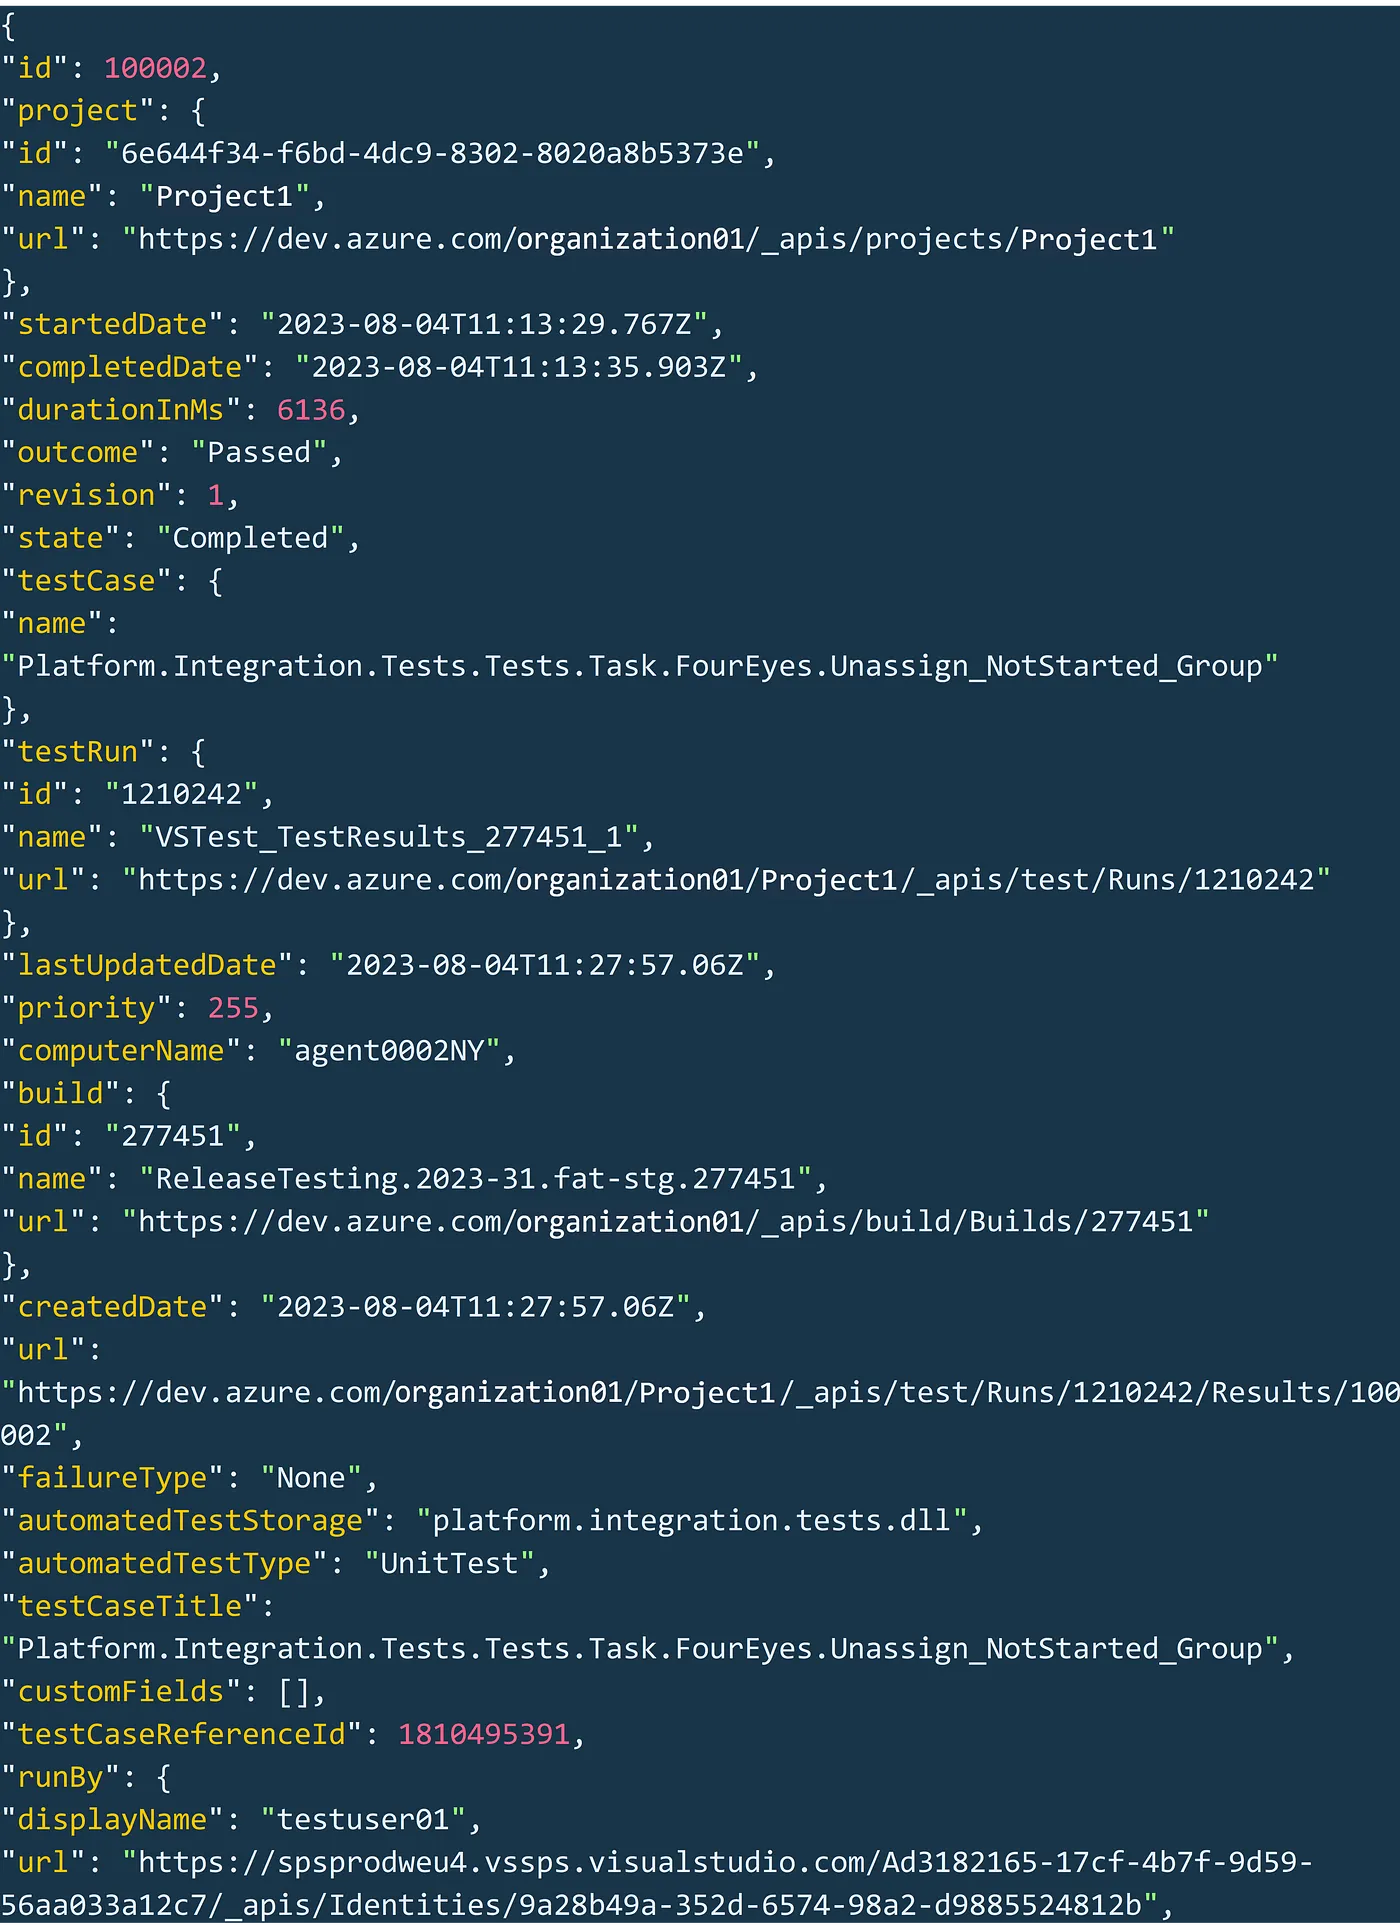
So, the big problem is how do we match each result to the belonging test case when there is absolutely nothing common between them to connect them? The endpoint to mark the test outcome looks like this:

Given that we possess the variables “$Organization” and “$Project,” as well as the capability to readily identify “$PlanId” and “$SuiteId” (by accessing our Test Plan and locating the respective IDs in the URL), the challenge becomes providing this information to our PowerShell script. An insight dawned upon us: we do wield control over how the automated test is named. By incorporating the test case ID from Azure Test Plans into the test’s name within the code, it should subsequently appear in the “Title” value of the object.
Consequently, our task narrows down to identifying the object with the relevant name, extracting its ID and Outcome, and subsequently transmitting these details within the body of the request to the previously mentioned endpoint, as illustrated below:
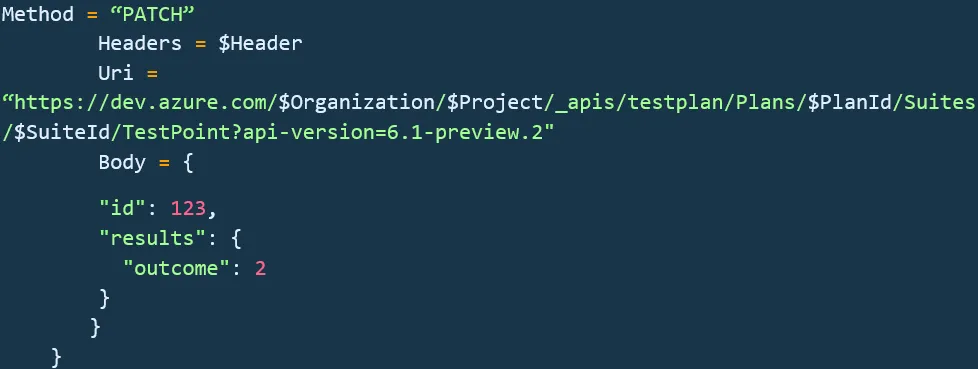
Subsequently, we incorporate a function designed to traverse the test requests and modify each test point to reflect the updated test outcome. Once the outcomes are annotated, the last step involves generating a chart to present the consolidated data on the Azure DevOps Dashboard. This empowers stakeholders to efficiently review all the results across multiple regression runs in a single comprehensive view.
UI performance
Standards establishment
Collaborated with the first client to test the 7 main UI pages, determining baseline response times. These baselines guide future performance benchmarks and UI performance report color-coding.
Performance parameters
- Over 500ms slower than the baseline: flagged for review.
- Between 100ms faster to 500ms slower: acceptable.
- 200ms faster or more: exemplary.
Automated testing
We implemented Cypress for UI performance testing. The scheduled weekly suite runs every Monday morning during moderate traffic in the acceptance environment. Implemented a daily pipeline scheduled for execution at 4:00 AM, focusing on prioritizing data from Mondays to ensure a more accurate representation of real-world scenarios.
Suite explanation
The performance testing suite leverages the browser’s performance object to assess metrics such as page load time. Specific pre-configured data from a designated environment is required to initiate the suite, and the test suite itself furnishes this essential data. Initially, a test user logs in, which is contained in a “before” loop to avoid influencing the measurement data. A “for” loop then encompasses all the tests and can accept a parameter for the number of iterations (default is 30 if unspecified).
Pages 1–7 follow a structured approach:
1. Navigate to the designated page.
2. Mark the performance start.
3. Capture and wait for specific backend requests.
4. Monitor for the disappearance of the ‘loading…’ overlay or specific UI elements.
5. Set performance end marker and save duration.
6. After the last page’s step, the suite initiates a new iteration, returning to the first page.
Post-test reporting
- Data sorting: Arrays are sorted in ascending order.
- Average calculation: Average load time per page derived.
- Median determination: Employed a “calculatePercentile” function with a 0.5 parameter.
- 95th percentile computation: Utilized the “calculatePercentile” function with a 0.95 parameter.
- Report file generation: Employed cy.writeFile() in Cypress to produce a text report. Contains Average, Median, 95th percentile values per page, test start timestamp, environment, and iteration count.
Test execution
Execution management relies on Azure pipelines, with a central orchestrating pipeline connecting to several smaller pipelines as Azure jobs. These jobs encapsulate both build and execution instructions. The test execution process is shaped by test types parallelization and is structured into stages.
In summary, the platform’s behavior is shaped by a combination of system configuration and deployed banking products, necessitating adaptable test execution. Azure pipelines facilitate this process, with an orchestrating pipeline overseeing multiple smaller pipelines. The process is structured to accommodate different test types and parallel execution, following a stage-based approach.
Hope we can provide some insight within this snippet:
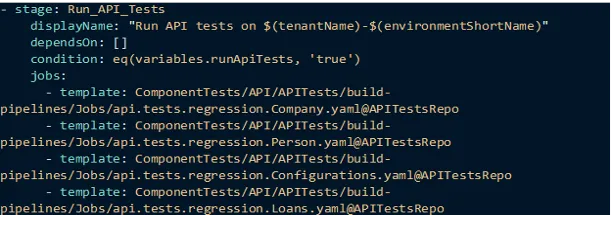
Stages within the process are guided by conditions, specifically variables, which determine whether a stage should be executed. As anticipated, certain stages exhibit dependencies on others, and this relationship is reciprocal.
Jobs are employed as templates, with references directed to repositories housing YAML files. This approach allows the distribution of responsibilities and ownership without requiring direct oversight of the YAML content. Consequently, development teams are empowered to define both the tests to be conducted and their execution methods.
Summary
Covering all the mentioned aspects of core banking product testing was essential for gaining trust, integrity, security, and functionality in this financial product. We hope that with this article we have at least helped someone to understand the aspects of testing a sole product like this and gave an idea about a potential testing approach.
As technology advances and customer expectations rise, investing in robust testing processes becomes a strategic necessity for customers to stay competitive and trustworthy in an ever-changing financial landscape.
Dušan Borota,
Damir Miljković
Levi9 Serbia


