Single- and multi-tenant systems: An introduction
Before we can start working on our new, super-hot and fancy cloud-based solution, there are some architectural decisions we have to make. One of them is how to model and store business and customer data.
Single-tenant and multi-tenant systems are the most common options to choose from. Their simple representation can be seen on the diagrams below.
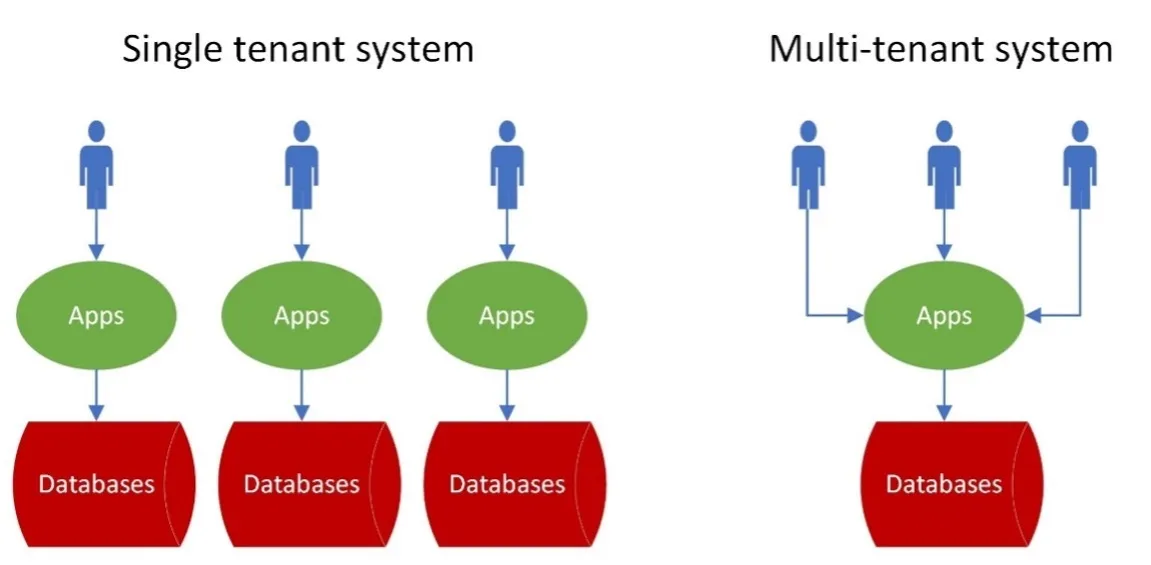
A multi-tenant architecture is one where a single software instance serves multiple customers (i.e., tenants). In a multi-tenant architecture, each customer shares the same database and application. Multi-tenancy is typically ideal for businesses that want an easier startup experience and fewer hardware requirements.
On the other hand, a single-tenant cloud architecture is the one where a single software instance and its supporting infrastructure serve only one customer. In a single-tenant system, customer data and interactions are isolated for each customer. Customer data is not housed in the same database and there’s no sharing of data in any way. Data security, reliability and disaster recovery are achieved by default since data and resources are not shared.
Having this single-tenant system in place, it enables each customer to finetune the software to best suit the needs of their specific business. This exact opportunity to customize a tenant per customer requirements is the most suited for the fintech sector (mainly of comprising companies providing digital financial services, like banks). One important thing to mention is that each client uses the same software solution, the only difference being in how it is configured.
While having an option to customize your solution is great, it represents a great challenge that software developers need to overcome. Let’s tackle one of those customization scenarios in this article.
What we want to achieve
Talking about customization of the software by changing some things is one thing, but implementing it is another.
In the modern world we live in now, when it comes to software customization, there is no such thing as an excessive amount of customization available. Users want to have control over the apps and systems they are using, and we as developers need to provide that. Single-tenant systems are highly motivated by that customization, which makes them highly flexible, even though every customer has the same software instance.
Well, let’s not be that strict, you shouldn’t be able to customize everything.
Let’s look at the following scenario: A user wants to customize input fields on the forms of the front desk web application. This customization should be performed on the customer’s tenant and then applied to the desired environment.
Let’s consider the following setup: A tenant in this scenario controls how each environment inside is operating by customizing it. A tenant should support multiple environments to enable a customer to test their customized solutions before it hits production. In that manner, an environment represents a set of apps, databases and other resources required to execute daily banking tasks and procedures.
So, how to set up our system? Let’s dive into it. We have the following levels:
-
Platform: Top level, controlling all tenants. This level is there for our own system administrators to create, delete, update tenants and environments.
-
Tenant: Each tenant represents one client (aka bank). Tenants are separate instances in the system, containing their own resources, apps, and services to manage functionalities that a client might use on the level below.
- Environment: Each tenant can contain several environments. Usually, there will be at least one, where production ready version of the configured system will be running. Clients can have other environments which can be used to test new functionalities or new customizations before they are released to the production environment.
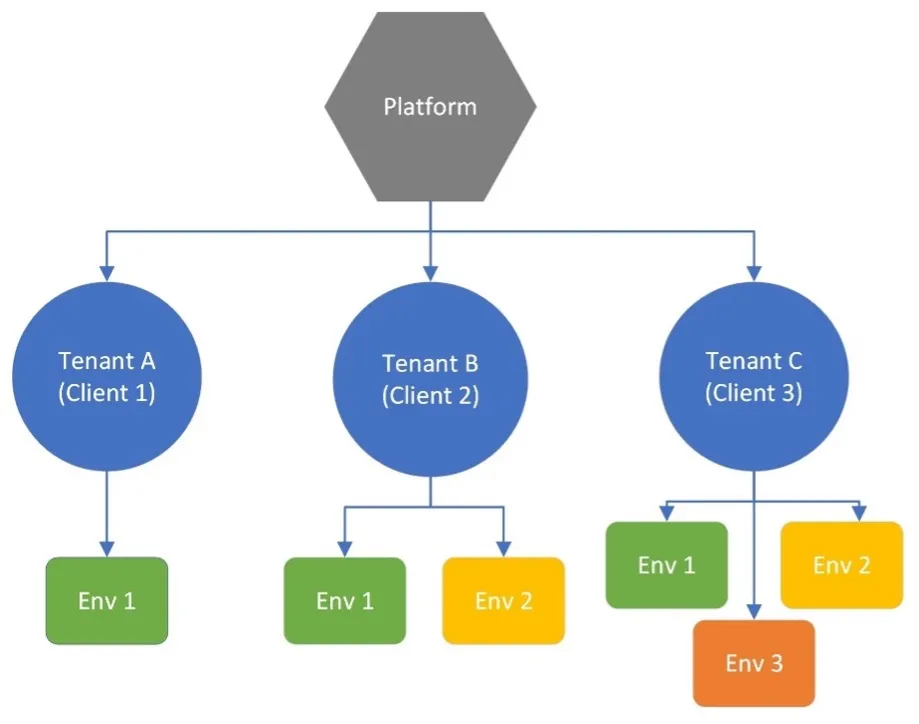
As we have these levels in our system, we need to provide the client with an option to customize settings for its tenant and apply the settings to an environment.
A tenant has its own web application exposed (Admin Portal) to see the settings and change them as needed. This portal is intended to be used by tenant administrators.
An environment also has its front desk web application (Client Portal) exposed which will utilize the above settings. This portal is intended to be used by bank employees to execute day-to-day tasks and procedures.
What’s the plan?
One specific customization option is to customize lists of static data that the Client Portal will use to display options on input fields within forms. A user will be able to set visibility of a specific static data setting for each setting type, like address types, countries, nationalities etc. By changing specific properties of setting types, the user will in the end create a configuration item, which can then be applied to a specific environment. A configuration item consists of all static data setting types and its values.
Before we could display anything to the user, so he can start configuration process, we will have to think of a solution for storing initial values and user-defined changes, and afterwards have smart logic that will compare the initials values per setting type with the changed values and return a result set.
Initial values, or predefined values come with the initial version of the system. A user doesn’t have to change anything and the Client Portal will work, supporting basic scenarios. These initial values are the starting point that can be changed by a tenant administrator in Admin Portal.
Let’s explain the flow of creating and using the configuration with the diagram below:
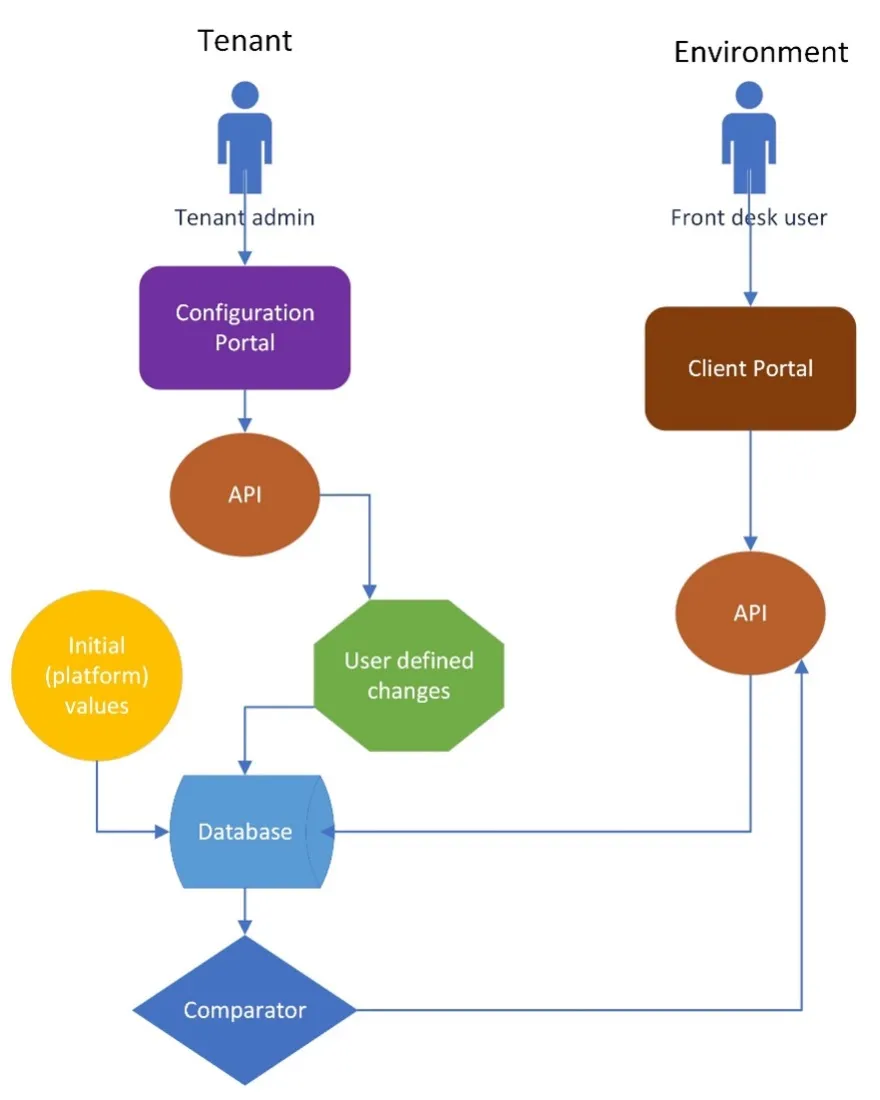
A tenant administrator creates a configuration item via Configuration Portal by making some changes to the initial values. These changes are stored into the database, alongside already present initial values. The administrator then applies the changes to the desired environment.
Next, a front desk user opens a page in the Client Portal. That page requires configuration values to be displayed correctly. Initial values and user-defined changes are fetched from the database, passed to the comparator which compares the data and then returns the result set. Afterwards, the result set is returned to the Client Portal.
Implementation
Let’s talk now about the actual implementation.
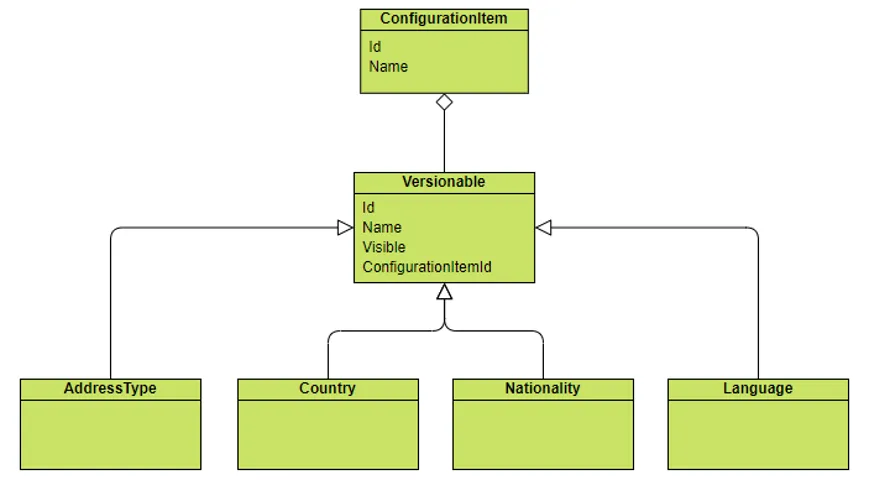
To distinguish each individual configuration item, or set of static data configurations, we introduced a ConfigurationItem class.
All the setting type classes will have a foreign key to the ConfigurationItem class. This foreign key allows us to find all changes per configuration item.
Now we can go a step further into our structure and define a parent class called Versionable for all setting type classes. It will be used for storing initial values and user-defined changes as well. Setting type classes will inherit properties from the Versionable class. Some examples of setting values are Address Types, Countries, Nationalities, Languages, Genders, Marital Statuses and many more.
The above structure is shown in the diagram below:
With the classes representing our data model in place, we can now create two separate, but similar database contexts which will be our ORM connector to the DB storage.
- Initial values context to access initial values.
- User changes context to store, update, and access actual changes per setting type.
Each of these database contexts are stored in a different database schema; however, they use the same class structure, as shown in the diagram above. The main reason why there is a database context and database schema split between initial values and user changes is to enable the system to have initial values in place for each customer. As mentioned before, initial values come with the system itself, and that is achieved by data seeding the initial values. The system needs to work, regardless of whether the user changed anything or not. This data seeding ensures that each client (tenant) has the same software deployed.
To persist setting changes and later fetch them from the database, a generic repository pattern is used, since every setting type inherits the Versionable class. Having two context classes, there are also two generic repository classes created for them:
- Initial values repository
- User changes repository
Our data structure can be visualized with the diagram below:
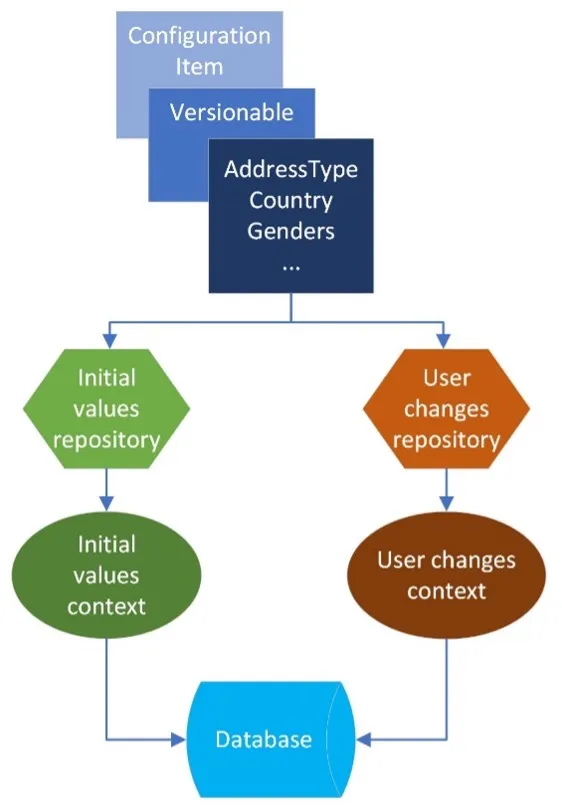
Let us explain all of the above with some examples by going through it step by step.
Step 1: Initial values are stored in DB
Initial values look like this when stored into DB:
ConfigurationItems

AddressTypes

We can see in the example above there are initial values defined within Configuration item called Initial item. That configuration item has two address types, which are both set as visible.
Step 2: User makes their own changes
Now that we have all of the above, our setup is ready to be used. Let’s say our user creates a change for the one of the AddressType setting values and set its Visible property to false. Of course, the user creates a ConfigurationItem with specific ConfigurationItemId which is linked to that Address type change.


Step 3: User applies changes to the environment
Now the user decides to apply that ConfigurationItem to the environment. By applying it to the specific environment, a relation between that environment and ConfigurationItem is created.

Step 4: Create a result set from initial values and user-defined changes
The question is how can the Client Portal fetch these applied changes correctly? That’s where our “comparator” comes into play.
To fetch setting types, the Client Portal passes an environmentId on which it is running. Using that environmentId we can find the latest ConfigurationItem applied to that environment (we have that relation stored in our DB). Having that ConfigurationItem and its ID, we can now fetch all user-defined changes for each static data setting type and afterwards the initial values.
The comparator receives initial values and user-defined changes for each setting type. Then, it iterates through the list of the initial values, and it finds its matching counterpart in user-defined changes, since they use the same ID to store the values. In the example above, Address2, from the initial values, has the same ID as Address2 from user-defined changes.
- If there is no user-defined change for that ID, like in this example for the Address1 record, the comparator returns the record from the initial values list.
- If there is a change, like for the Address2 record, the comparator returns that change as a result.
In the end, it returns an updated initial values set, which looks like this for AddressType:

Now the result set includes both address types from initial values; however, Address2 Visible property is updated from the user changes and now it has the False value.
Conclusion
Every system, regardless of its size, complexity, architectural design, and technologies used, has its own challenges. Our own challenge within the single-tenant system was to enable our users to create customizations on tenant level and then apply them to the desired environment. Specifically, to customize input fields on the forms of the front desk web application.
We overcome this challenge by having initial values stored in the database, letting the user define their own changes and apply them to the desired environment using the so-called Admin Portal web app. Later, these changes, together with the initial values, are fetched from the database, compared using our custom-built comparator and returned to the front-desk web app Client Portal which will use them to display input fields correctly.
This is just one example of the customizations we had to deal with. As a follow-up article, next time, we can discuss how to customize input form layout by creating sets of input fields per specific entity type and apply them to the desired environment.


